Hotrod369
VIP
- Joined
- May 31, 2021
- Messages
- 387
Turn off Windows Security app with these easy methods
byVladimir Popescu
Vladimir Popescu
Managing Editor
Being an artist his entire life while also playing handball at a professional level, Vladimir has also developed a passion for all things computer-related. With an innate fascination... read more
Published on November 17, 2022
Reviewed byAlex Serban

Alex Serban
Windows Server & Networking Expert
After moving away from the corporate work-style, Alex has found rewards in a lifestyle of constant analysis, team coordination and pestering his colleagues. Holding an MCSA Windows Server... read more
- Windows Defender is a resource-intensive application that can run to slow down your computer.
- You must permanently turn it off if you want to disable Windows Defender due to privacy concerns.
- However, disabling the service might leave you vulnerable to security threats.

Disabling Windows Defender permanently can be tricky since it involves modifying the integral settings of Windows. A wrong step while making the changes might result in the malfunction of your computer.
In this guide, we will discuss all the methods that can help you turn off Windows Defender on your Windows 11 computer for good.
How to temporarily disable Windows Defender on Windows 11?
If you want to disable Windows Defender for a while to make some changes to your computer, follow these steps:- Press Windows+ I to open Settings.
- Go to Privacy & Security and click Windows Security

3. Now go to Virus & threat protection
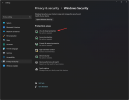
4. Click Manage Settings.

5. Now toggle off the switch underneath Real-time protection.

Note: Real-time protection will be active after you restart your computer.
Now that we covered the situation in which you want to disable the Windows Defender app on Windows 11 for a limited amount of time, we can also look into how to do it permanently.
How do I permanently disable Windows Defender on Windows 11?
Before making changes, turn off the Real-time protection of Windows Defender so that it doesn’t hinder the process.1. Change Folder Ownership
1.1 Boot your computer in Safe Mode
- Press Windows+ R to get the Run console.
- Type msconfig to open System Configuration

3. Go to Boot. Under Boot options, put a checkmark to select Safe boot and Minimal.
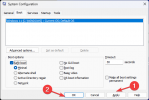
4. Click Apply and OK
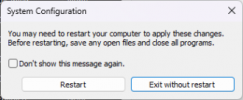
5. Your computer will restart in Safe mode.
1.2 Modify Permissions
- Press Windows+ E to open Windows Explorer.
- Now copy and paste the below-mentioned path and hit Enter.
- C:\ProgramData\Microsoft\Windows Defender
- Navigate to the Platform folder and right-click on it to select Properties.

5. Go to the Security tab, then click Advanced.
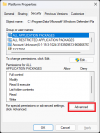
6. On Advanced Security Settings for Platform, locate Owner and click Change
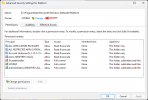
7. In the Enter the object name to select box, type the Owner name and click OK
8. Under Permission Entries, select System and click Remove.
9. Head to Trusted Installer and click Remove.
10. Checkmark Replace owner on subcontainers and objects.
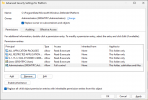
11. Now put a checkmark on Replace all child object permission entries with inheritable permissions from this object.
12. Click Apply and then OK.
1.3 Disable Safe Boot
- Press Windows+ R to open the Run window.
- Type msconfig and hit Enter.
- Go to boot and select Boot options.
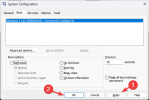
4. Uncheck the Safe boot option.
5. Click Apply and OK.
6. Restart your computer.
2. Using Regedit
Before making any changes to Registry Editor values, make sure you take a backup. To do that, on the Registry Editor window, click File, then select Export. Now save the .reg file to a desirable location.
- Boot your computer to Safe Mode by following the steps mentioned above.
- Press Windows+ R to open the Run window

3. Type regedit and hit Enter.
4. Copy and paste these paths to the address bar of Registry Editor one by one and for the DWORD Start, change the Value data to 4
Computer\HKEY_LOCAL_MACHINE\SYSTEM\CurrentControlSet\Services\Sense
Computer\HKEY_LOCAL_MACHINE\SYSTEM\CurrentControlSet\Services\WdNisDrv
Computer\HKEY_LOCAL_MACHINE\SYSTEM\CurrentControlSet\Services\WdNisSvc
Computer\HKEY_LOCAL_MACHINE\SYSTEM\CurrentControlSet\Services\WdBoot
Computer\HKEY_LOCAL_MACHINE\SYSTEM\CurrentControlSet\Services\WinDefend
Computer\HKEY_LOCAL_MACHINE\SYSTEM\CurrentControlSet\Services\WdFilter
Next, follow Disable Safe Boot steps to get your computer to normal mode.
3. Using Group Policy Editor
3.1 Disable Tamper Protection
- Press Windows+I to get Settings.
- Go to Privacy & Security and click Windows Security.

3. Click Virus & threat protection
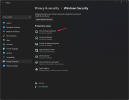
4. Now click Manage Settings

5. Toggle off the switch under Tamper Protection and press OK to confirm.

3.2 Make changes in Group Policy Editor
1. Press Windows+ R to open the Run console.
2. Type gpedit.msc and hit Enter to open Group Policy Editor.

3. Follow this path to get to Microsoft Defender Antivirus
Computer Configuration\ Administrative Templates\ Windows Components\Microsoft Defender Antivirus
4. On the right pane, double-click on Turn off Microsoft Defender Antivirus.
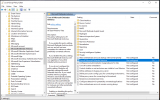
5. Now click on the radio button beside Enabled to disable Windows Defender permanently
- Click Apply and then OK.
- Restart your computer for changes to take effect.
4. Use Autoruns
- Download Autoruns and extract the zip file to the desired location.
- Use the above-mentioned method to go into Safe Mode and restart your computer.
- In Safe mode, right-click on the Autoruns.exe file and choose Run as administrator.

4. Navigate to the Services tab.
5. Now click on Options from the menu bar and remove the checkmark from Hide Windows Entries.
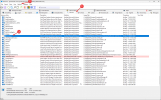
6. Locate and remove the checkmark beside the WinDefend service to turn off Windows Defender.
7.Now, disable the Safe Boot mentioned above and restart your PC.
So, these are the ways to disable Windows Defender permanently on your Windows 11 computer. To ensure Windows Defender is disabled, you can open Windows Security. Then, on Virus & threat protection page, you will see the Getting protection info message implying that Windows Defender is turned off.
